Making a Template
In the previous three chapters of this tutorial, you have learned how to write a document in Typst, apply basic styles, and customize its appearance in-depth to comply with a publisher’s style guide. Because the paper you wrote in the previous chapter was a tremendous success, you have been asked to write a follow-up article for the same conference. This time, you want to take the style you created in the previous chapter and turn it into a reusable template. In this chapter you will learn how to create a template that you and your team can use with just one show rule. Let’s get started!
Reusing data with variables
In the past chapters, most of the content of the document was entered by hand. In the third chapter, we used the document element and context to cut down on repetition and only enter the title once. But in practice, there may be many more things that occur multiple times in your document. There are multiple good reasons to just define these repeated values once:
- It makes changing them later easier
- It allows you to quickly find all instances where you used something
- It makes it easy to be consistent throughout
- For long or hard-to-enter repeated segments, a shorter variable name is often more convenient to type
If you were using a conventional word processor, you might resort to using a placeholder value that you can later search for. In Typst, however, you can instead use variables to safely store content and reuse it across your whole document through a variable name.
The technique of using context to reproduce an element’s property we have learned earlier is not always the most appropriate for this: Typst’s built-in elements focus on semantic properties like the title and description of a document, or things that directly relate to typesetting, like the text size.
For our example, we want to take a look at Typst’s pronunciation. One of the best ways to transcribe pronunciation is the International Phonetic Alphabet (IPA). But because it uses characters not found on common keyboards, typing IPA repeatedly can become cumbersome. So let’s instead define a variable that we can reference multiple times.
#let ipa = [taɪpst]Here, we use a new keyword, let, to indicate a variable definition. Then, we put the name of our variable, in this case, ipa. Finally, we type an equals sign and the value of our variable. It is enclosed in square brackets because it is content, mirroring how you would call a function accepting content. In other words, this syntax mirrors the phrase “Let the variable ipa have the value [taɪpst].”
Now, we can use the variable in our document:
#let ipa = [taɪpst]
The canonical way to
pronounce Typst is #ipa.
#table(
columns: (1fr, 1fr),
[Name], [Typst],
[Pronunciation], ipa,
)
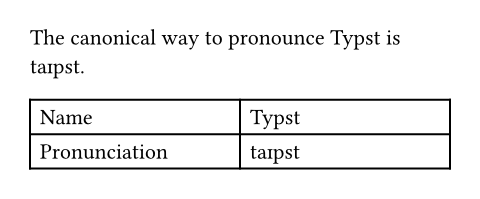
In the example, you can see that the variable can be used both in markup (prefixed with a #) and in a function call (by just typing its name). Of course, we can change the value of the variable and all its occurrences will automatically change with it. Let’s make it a bit clearer what is IPA and what is normal prose by rendering IPA in italics. We are also using slashes which, by convention, often enclose IPA.
#let ipa = text(
style: "italic",
)[/taɪpst/]
The canonical way to
pronounce Typst is #ipa.
#table(
columns: (1fr, 1fr),
[Name], [Typst],
[Pronunciation], ipa,
)

Here, we called the text function and assigned its return value to the variable. When you call a function, it processes its arguments and then yields another value (often content). So far in this tutorial, we called most functions directly in markup, like this: #text(fill: red)[CRIMSON!]. This call to the text function returns the red text as a return value. Because we placed it in markup, its return value just immediately got inserted into the content we wrote. With variables, we can instead store it to use it later or compose it with other values.
Variables are not limited to storing content: they can store any data type Typst knows about. Throughout this tutorial, you made use of many data types when you passed them to Typst’s built-in functions. Here is an example assigning each of them to a variable:
// Content with markup inside
#let blind-text = [_Lorem ipsum_ dolor sit amet]

// Unformatted strings
#let funny-font = "MS Comic Sans"

// Absolute lengths (see also pt, in, ...)
#let mile = 160934cm

// Lengths relative to the font size
#let double-space = 2em

// Ratios
#let progress = 80%

// Integer numbers
#let answer = 42

// Booleans
#let truth = false

// Horizontal and vertical alignment
#let focus = center
In this chapter of the tutorial, you will leverage variables and your own functions to build templates that can be reused across multiple documents.
A toy template
In Typst, templates are functions in which you can wrap your whole document. To learn how to do that, let’s first review how to write your very own functions. They can do anything you want them to, so why not go a bit crazy?
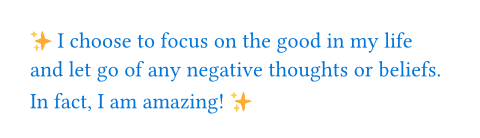
#let amazed(term) = box[✨ #term ✨]
You are #amazed[beautiful]!

Comparing this against the previous section, you may have noticed that this looks a lot like a variable definition using let. This instinct is correct: Functions are just another data type. Here, we are defining the variable amazed, assigning it a function that takes a single argument, term, and returns content with the term surrounded by sparkles. We also put the whole thing in a box so that the term we are amazed by cannot be separated from its sparkles by a line break. The special function definition syntax makes the definition shorter and more readable, but you can also use the regular variable definition syntax (see the scripting reference for details). After its definition, we are able to call the function just like all built-in functions.
Many functions that come with Typst have optional named parameters. Our functions can also have them. Let’s add a parameter to our function that lets us choose the color of the text. We need to provide a default color in case the parameter isn’t given.
#let amazed(term, color: blue) = {
text(color, box[✨ #term ✨])
}
You are #amazed[beautiful]!
I am #amazed(color: purple)[amazed]!

Templates now work by wrapping our whole document in a custom function like amazed. But wrapping a whole document in a giant function call would be cumbersome! Instead, we can use an “everything” show rule to achieve the same with cleaner code. To write such a show rule, put a colon directly after the show keyword and then provide a function. This function is given the rest of the document as a parameter. The function can then do anything with this content. Since the amazed function can be called with a single content argument, we can just pass it by name to the show rule. Let’s try it:
#show: amazed
I choose to focus on the good
in my life and let go of any
negative thoughts or beliefs.
In fact, I am amazing!
Our whole document will now be passed to the amazed function, as if we wrapped it around it. Of course, this is not especially useful with this particular function, but when combined with set rules and named arguments, it can be very powerful.
Embedding set and show rules
To apply some set and show rules to our template, we can use set and show within a content block in our function and then insert the document into that content block.
#let template(doc) = [
#set text(font: "Inria Serif")
#show "something cool": [Typst]
#doc
]
#show: template
I am learning something cool today.
It's going great so far!

Just like we already discovered in the previous chapter, set rules will apply to everything within their content block. Since the everything show rule passes our whole document to the template function, the text set rule and string show rule in our template will apply to the whole document. Let’s use this knowledge to create a template that reproduces the body style of the paper we wrote in the previous chapter.
#let conf(title, doc) = {
set page(
paper: "us-letter",
header: align(
right + horizon,
title
),
columns: 2,
...
)
set par(justify: true)
set text(
font: "Libertinus Serif",
size: 11pt,
)
// Heading show rules.
...
doc
}
#show: doc => conf(
[Paper title],
doc,
)
= Introduction
...
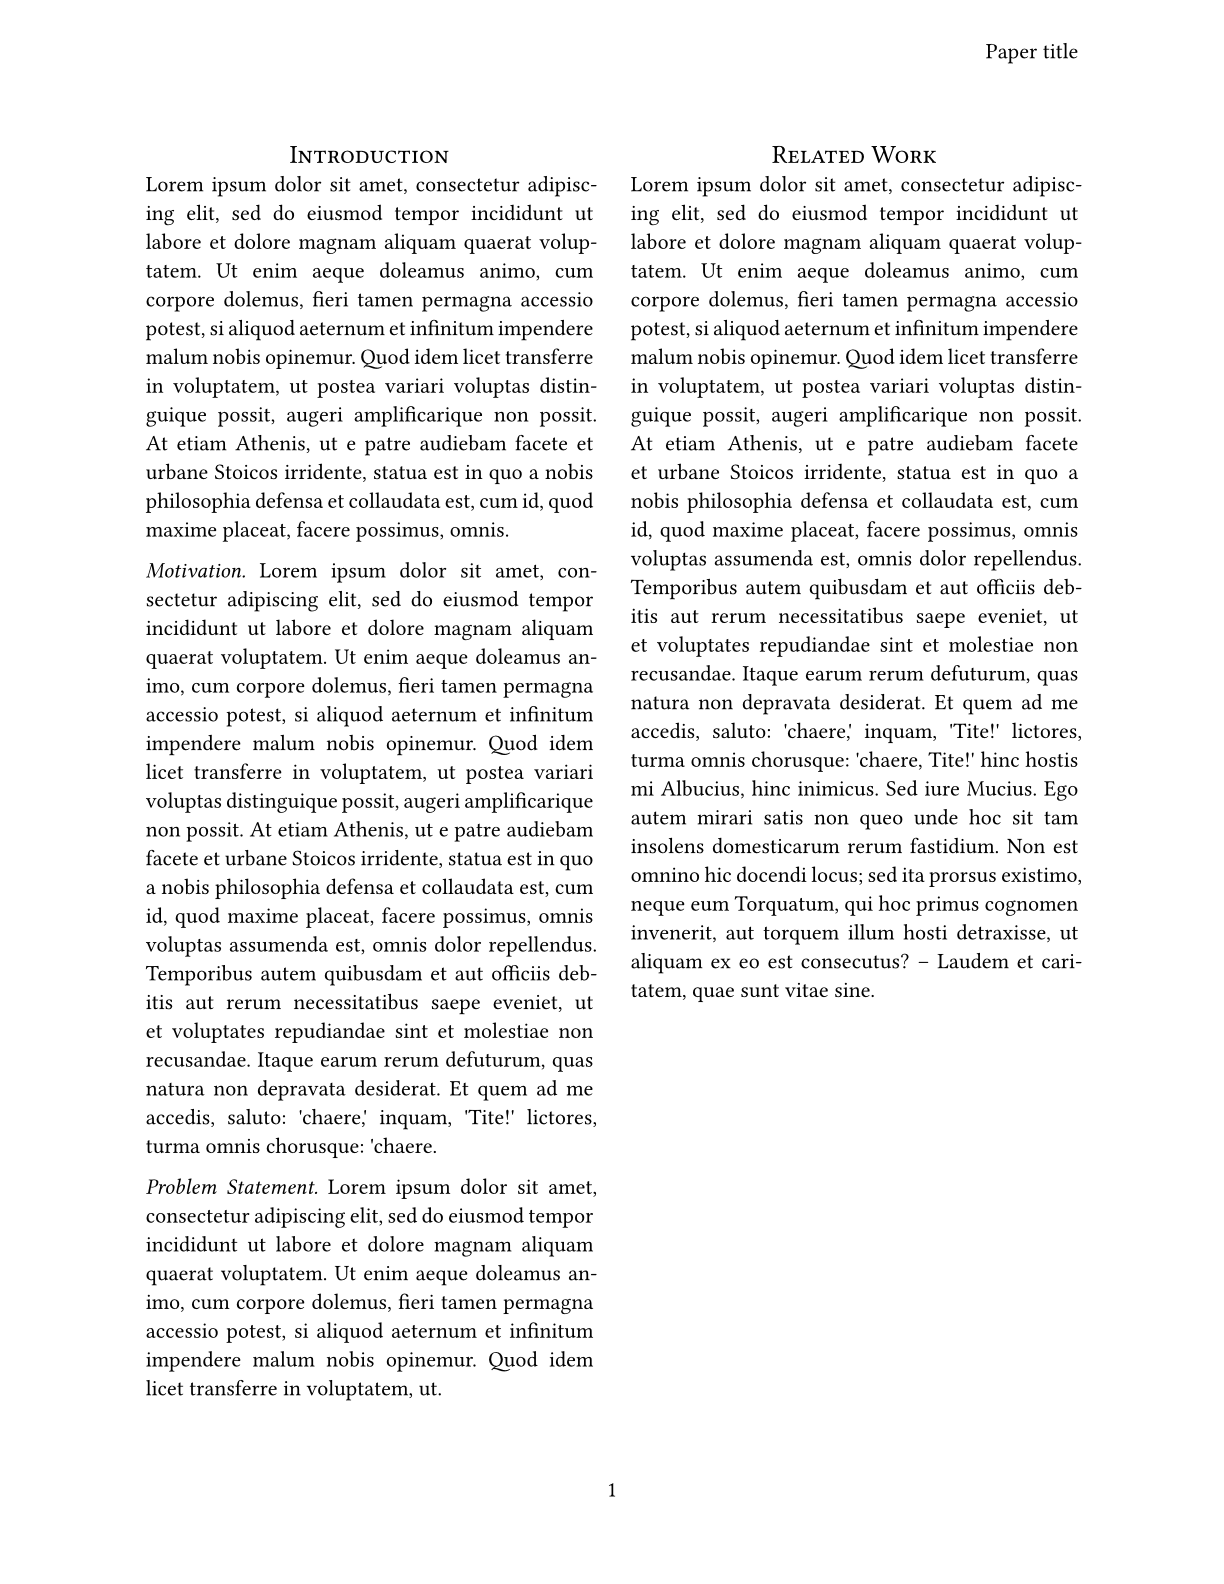
We copy-pasted most of that code from the previous chapter. The two differences are this:
We wrapped everything in the function
confusing an everything show rule. The function applies a few set and show rules and echoes the content it has been passed at the end.Moreover, we used a curly-braced code block instead of a content block. This way, we don’t need to prefix all set rules and function calls with a
#. In exchange, we cannot write markup directly in the code block anymore.
Also note where the title comes from: We previously had it inside of a variable. Now, we are receiving it as the first parameter of the template function. To do so, we passed a closure (that’s a function without a name that is used right away) to the everything show rule. We did that because the conf function expects two positional arguments, the title and the body, but the show rule will only pass the body. Therefore, we add a new function definition that allows us to set a paper title and use the single parameter from the show rule.
Templates with named arguments
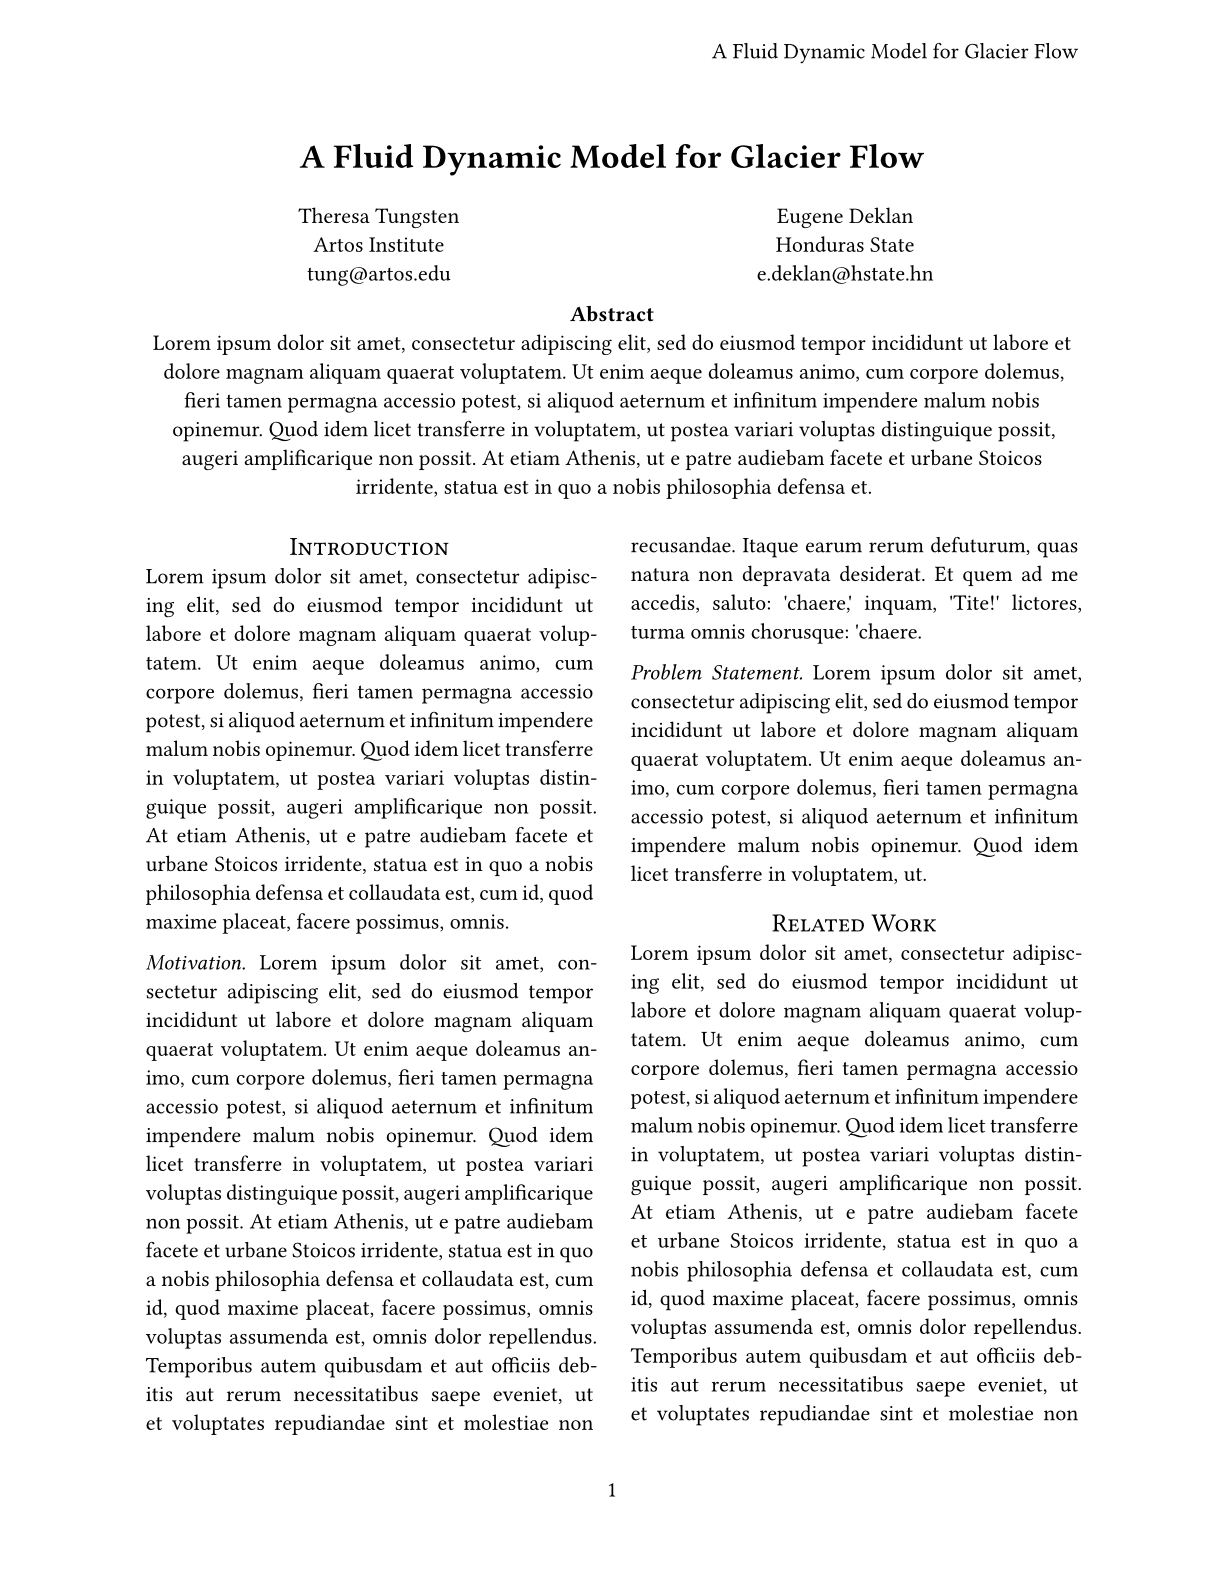
Our paper in the previous chapter had a title and an author list. We can keep the title as document metadata, but our template should also accept a list of authors with their affiliations and the paper’s abstract. We’ll add those as named arguments. In the end, we want it to work like this:
#set document(title: [
  A Fluid Dynamic Model for
  Glacier Flow
])

#show: doc => conf(
  authors: (
    (
      name: "Theresa Tungsten",
      affiliation: "Artos Institute",
      email: "tung@artos.edu",
    ),
    (
      name: "Eugene Deklan",
      affiliation: "Honduras State",
      email: "e.deklan@hstate.hn",
    ),
  ),
  abstract: lorem(80),
  doc,
)

...
Let’s build this new template function. The title can be displayed with the title function and accessed through document.title, so the template only needs named authors and abstract parameters with empty defaults. Next, we copy the code that generates title, abstract and authors from the previous chapter into the template, replacing the fixed details with the parameters.
The new authors parameter expects an array of dictionaries with the keys name, affiliation and email. Because we can have an arbitrary number of authors, we dynamically determine if we need one, two or three columns for the author list. First, we determine the number of authors using the .len() method on the authors array. Then, we set the number of columns as the minimum of this count and three, so that we never create more than three columns. If there are more than three authors, a new row will be inserted instead. For this purpose, we have also added a row-gutter parameter to the grid function. Otherwise, the rows would be too close together. To extract the details about the authors from the dictionary, we use the field access syntax.
We still have to provide an argument to the grid for each author: Here is where the array’s map method comes in handy. It takes a function as an argument that gets called with each item of the array. We pass it a function that formats the details for each author and returns a new array containing content values. We’ve now got one array of values that we’d like to use as multiple arguments for the grid. We can do that by using the spread operator. It takes an array and applies each of its items as a separate argument to the function.
The resulting template function looks like this:
#let conf(
  authors: (),
  abstract: [],
  doc,
) = {
  // Set and show rules from before.
  // ...

  place(
    top + center,
    float: true,
    scope: "parent",
    clearance: 2em,
    {
      title()

      let count = authors.len()
      let ncols = calc.min(count, 3)
      grid(
        columns: (1fr,) * ncols,
        row-gutter: 24pt,
        ..authors.map(author => [
          #author.name \
          #author.affiliation \
          #link("mailto:" + author.email)
        ]),
      )

      par(justify: false)[
        *Abstract* \
        #abstract
      ]

    }
  )

  doc
}
A separate file
Most of the time, a template is specified in a different file and then imported into the document. This way, the main file you write in is kept clutter free and your template is easily reused. Create a new text file in the file panel by clicking the plus button and name it conf.typ. Move the conf function definition inside of that new file. Now you can access it from your main file by adding an import before the show rule. Specify the path of the file between the import keyword and a colon, then name the function that you want to import.
Another thing that you can do to make applying templates just a bit more elegant is to use the .with method on functions to pre-populate all the named arguments. This way, you can avoid spelling out a closure and appending the content argument at the bottom of your template list. Templates on Typst Universe are designed to work with this style of function call.
#import "conf.typ": conf
#set document(title: [
A Fluid Dynamic Model for
Glacier Flow
])
#show: conf.with(
authors: (
(
name: "Theresa Tungsten",
affiliation: "Artos Institute",
email: "tung@artos.edu",
),
(
name: "Eugene Deklan",
affiliation: "Honduras State",
email: "e.deklan@hstate.hn",
),
),
abstract: lorem(80),
)
= Introduction
#lorem(90)
== Motivation
#lorem(140)
== Problem Statement
#lorem(50)
= Related Work
#lorem(200)
We have now converted the conference paper into a reusable template for that conference! Why not share it in the Forum or on Typst’s Discord server so that others can use it too?
Review
Congratulations, you have completed Typst’s Tutorial! In this section, you have learned how to define your own functions and how to create and apply templates that define reusable document styles. You’ve made it far and learned a lot. You can now use Typst to write your own documents and share them with others.
We are still a super young project and are looking for feedback. If you have any questions, suggestions or you found a bug, please let us know in the Forum, on our Discord server, on GitHub, or via the web app’s feedback form (always available in the Help menu).
So what are you waiting for? Sign up and write something!