Inspired by the excellent chef-cookbook by PaulMue0 with some significant differences.
So this is a template to write some recipes in a coherent cookbook with beautiful colors, appendices, indexes, and other stuffs in your language.
How to use it ?
You can use this template in the Typst web app by clicking “Start from template” on the dashboard and searching for fancy-cookbook.
Alternatively, you can use the CLI:
typst init @preview/fancy-cookbook
What’s in it ?
There is different functions to make your cookbook :
recipe: This function will help you write recipes with a very simple syntax, but it has advanced functions too to customize the render.cookbook: This function will help you for the book itself, it’s the most important part. All of this needs the usage of cookbook and recipe. You’ll use this one before everything else, but for a better comprehension, I will describe this one after the recipe.not-a-recipe: This one is here to help you write text in sections that not look like the recipes (there is more space here).chapter: This function can create a new chapter with a change of palette.cover-image: This one will help you put a cover image with a good integration to the cookbook.back-cover-image: This one is the same as the previous but for the back cover.set-all-palettes: this function help you to manually set all the pages where the palette changes.
Recipe
Minimal syntax to use it with an example:
#recipe(
  [Lychee whiskey],
  description: [Perfumed Whisky],
  servings: 6,
  prep-time: [2 min],
  cook-time: [10 min],
  ingredients: [
    - *1 l* flask empty and clean
    - *350 ml* of whisky
    - *150 g* of sugar
    - *1* vanilla stick
    - Some lychees
  ],
  instructions: [
    + Put the whisky, the sugar and the vanilla stick in the flask.
    + Add lychees in it the flask until the flask is full.
    + Let it macerate.
  ]
)
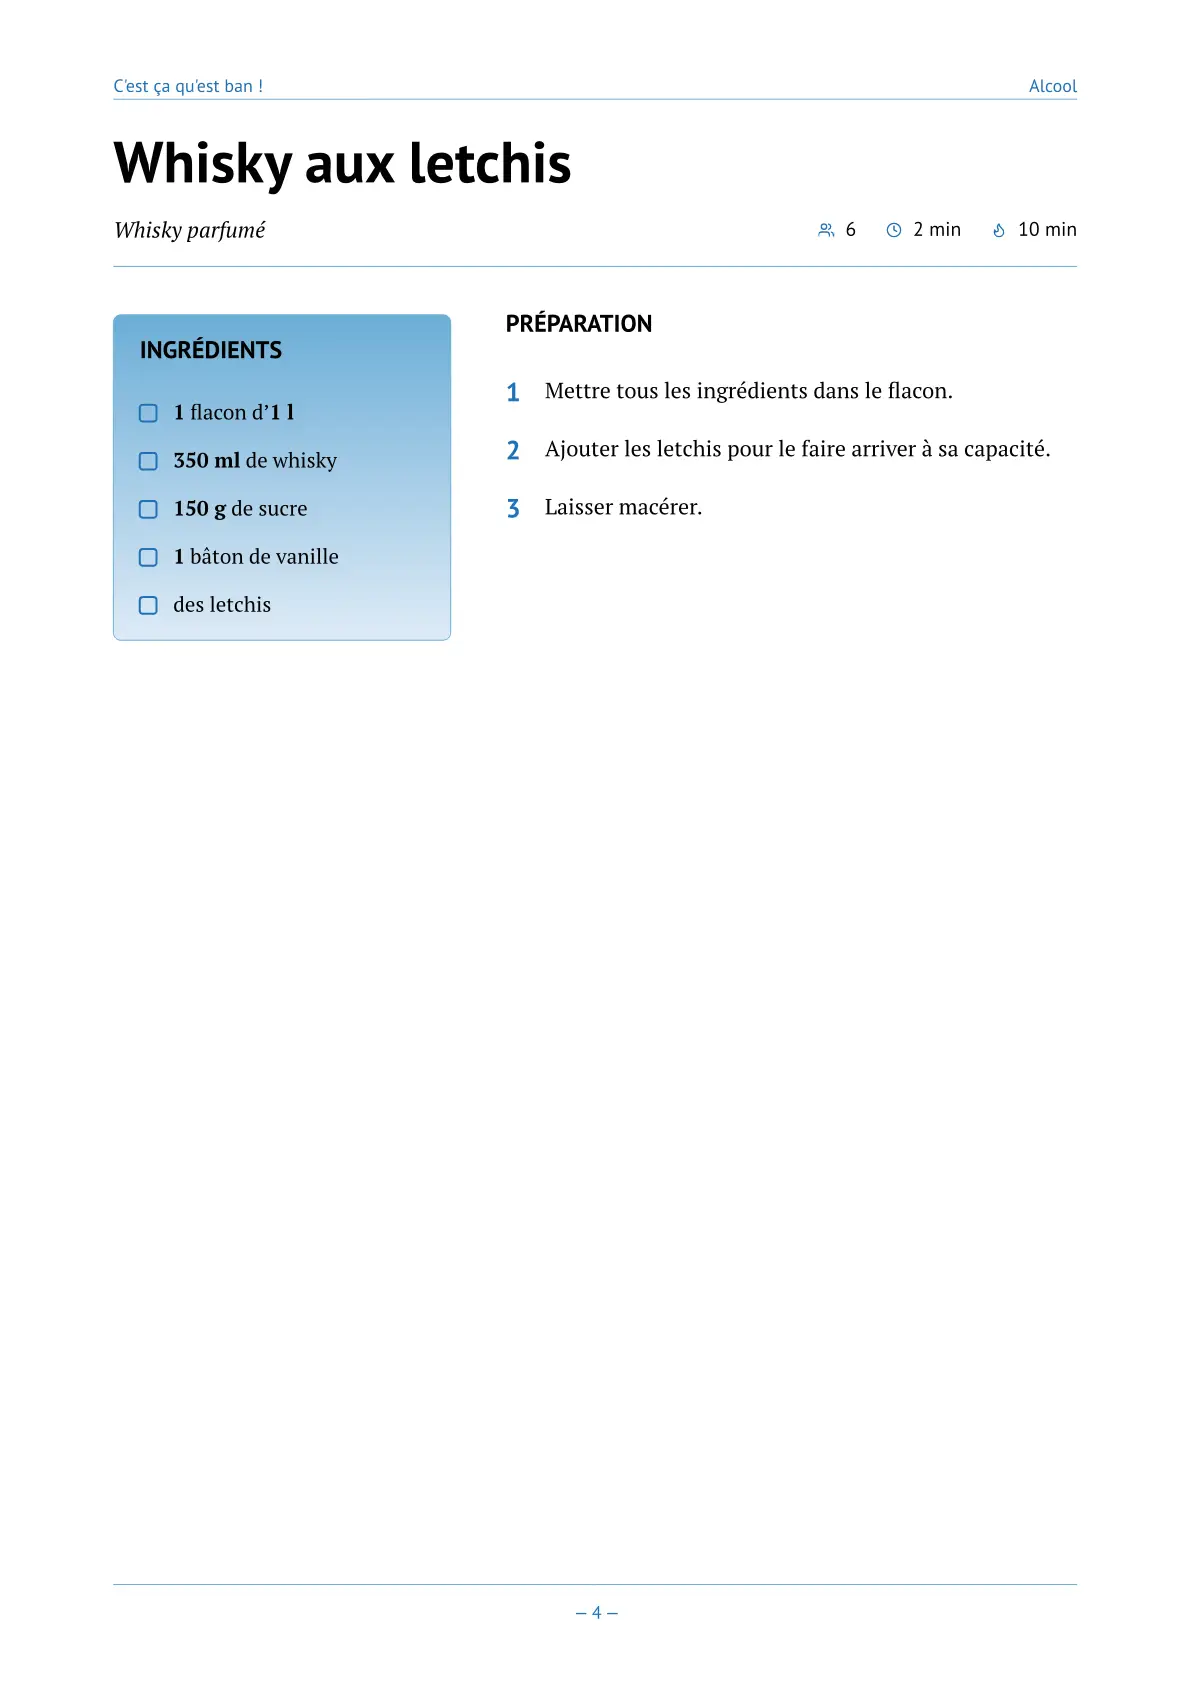
The first part, with the name, the description, servings, prep-time and cook-time is for the header part of the recipe that you can see here :

You can see the page header with the book’s title on the left and chapter title on the right and a line to separate from the header of the recipe which is also closed by a line
The second mandatory part is ingredients which as you can see is a content with a list. The third mandatory part is instructions which is a content with a numbered list.
This two parts will be dispatch in two columns. And all the body part of the recipe will be in the left or the right column. Here it is:

That’s it for the simplest recipe, but we have other options. First of all we can have groups of ingredients and groups of instructions.
Groups of Ingredients or Instructions
#recipe([Something Cool],
  description: [An imaginary recipe],
  servings: 6,
  prep-time: [2 min],
  cook-time: [10 min],
  ingredients: (
    (
      title: [Dough],
      items: [
        - Some flour
        - Eggs
      ]
    ),
    (
      title: [Trim],
      items: [
        - Mandragora roots
        - Chili powder
        - Sugar
      ]
    )
  ),
  instructions: (
    (
      title: [Dough],
      steps: [
        + Put all together and mix
        + Cast a hot spell to make it burns
      ]
    ),
    (
      title: [Garnish],
      steps: [
        + Mix all together
        + And put all of these in the garbage
      ]
    )
  )
)
So you can see that we have replaced the content with lists of dictionaries. The two known dictionaries have a key named title. For the ingredients, the key items will accept a content with a list, as it was before. For the instructions, the key steps will accept a content with a numbered list as it was before.
And the result is :

As you can see the numbering continue even if the lists are in different groups.
Other optional properties
image-left and image-right
#recipe(
  [Lychee whiskey],
  description: [Perfumed Whisky],
  image-left: image("asset/whisky.png")  // image-right or both
)
You can add images to the recipe, one is for the left column and the other for the right one. This option can let you adjust your recipe to fit in one page if you want.
notes and notes-right
#recipe(
  [Lychee whiskey],
  description: [Perfumed Whisky],
  notes: [If you add some coriander at the end, it will be amazing.]
)
notes will be placed in a block in the left column. This is the default behavior and that’s why it’s not named notes-left. But sometimes, the only way for the recipe to fit in one page is to have notes on the right side, so you have notes-right.
authors
If you want like me to credit authors for each recipe individually — your grandmother, for instance, this property is for you. But there is two syntaxes, one when you only have one author :
#recipe(
  [Banana Jam],
  description: [Sweet Jam],
  authors: [GrandMa]
)
and if you have multiple authors :
#recipe(
  [Banana Jam],
  description: [Sweet Jam],
  authors: ([GrandMa],[GrandPa])
)
The label used will reflect this and if you have multiples, they will appear with ‘,’ between them.
label
This one is very important for me. You can add a label for your recipe and use it as a reference in other recipe. For example, you have a recipe for Pizza Dough and different pizza recipes. First, you put a label to a recipe, then you can put a reference of the first recipe anywhere and it will be replaced by something like “Pizza Dough(p. 17)”.
Here is a small example of usage :
#recipe(
  [Pizza Dough],
  description: [Base Dough for Pizza],
  label: <pizzaDough>
)


#recipe(
    [Peperoni Pizza],
    ingredients: [
      - @pizzaDough
    ]
)
tags
The tags will not be seen in the recipe but will be used to create indexes that we will see in the cookbook part. But one thing to know is that if you put only one tag in a recipe, you’ll have an appendices part with an index at the end of the book.
#recipe(
  [Banana Jam],
  description: [Sweet Jam],
  tags: ("Banana", "Sweet", "Breakfast")
)
I prefer to use dictionaries for my tags, it can help you avoid mistakes (different spelling). Here is an example :
#let country = (
    france: "France",
    spain: "Spain"
)

#recipe(
  [Banana Jam],
  description: [Sweet Jam],
  tags: (country.spain)
)

#recipe(
  [Paella],
  description: [Very good],
  tags: (country.spain)
)
And you will see how it can help you build custom indexes in the cookbook part.
sort-title
When you use tags, you will have indexes, and I try to sort the recipes by their name. But sometimes, you use functions in the title of your recipe, sometimes, you use accents, and the sorted index will not appear like you want. So you can set this property with a value that will be compared to others (title or sort-title).
change-palette
If you want to change the palette when you describe a recipe, this property will do this for you.
Cookbook
The minimal cookbook usage :
#show: cookbook.with(
  title: "My Cookbook",
  subtitle: "All that good"
)

#chapter[Soups]

#recipe(
    [Soup of the day]
)
You just need a title and a subtitle to make your cookbook. And then you can add chapter and recipes. But you can customize your cookbook with all the next properties.
paper, font-size and margin
The paper property defines the page size.
You can see all available options in the Page Function
reference, under the paper parameter.
When you change the page size, you will likely need to adjust the font-size property as well.
The default value is 11pt, which works well for A4 paper.
Along with these two properties, you can also control the margins.
To set uniform margins on all pages (except the cover), use the margin property:
#show: cookbook.with(
  title: "My Cookbook",
  subtitle: "All that good",
  margin: (x: 2cm, top: 2.5cm, bottom: 2.5cm),
)
For all available margin options, refer to the Typst documentation.
If you plan to print and bind your cookbook, Typst offers a particularly handy option worth
knowing about: the inside and outside margin values. Instead of thinking in terms of
left and right, these values adapt to whether a page is a recto (right-hand, odd) or a
verso (left-hand, even) — which is exactly what you need for a bound document.
The inside margin (the gutter, toward the spine) should be wider than the outside margin
to keep the text comfortably readable once the pages are bound together:
#show: cookbook.with(
  title: "My Cookbook",
  subtitle: "All that good",
  margin: (inside: 3cm, outside: 2cm, top: 2.5cm, bottom: 2.5cm),
)
subtitle, date and cover-image
All of these properties are used in the cover page with the title. Set values to see what changes.
By default, date is set as today and you can see the month and the year at the page bottom.
For the cover-image property, I recommend to use the built-in function cover-image like this:
cover-image: cover-image("assets/TonkotsuRamen.jpg"),
this will ensure that your image integrate with the cover with efficiency.
back-cover-content, back-cover-image and book-author
The back-cover is optional. But if you set a value for back-cover-content or back-cover-image the back-cover will appear. As the cover is at page 1 (odd page), the back-cover will always be in an even page, to close your book.
As the name said, the back-cover-content property accept a content.
For the back-cover-image property, I recommend to use the built-in function back-cover-image like this:
back-cover-image: back-cover-image("assets/hearts.jpg"),
Finally, the book-author is visible only in the back cover page. So, if you set a value, you will see it in this page.
custom-cover and custom-back-cover
These properties let you design your own cover and back-cover and give it to the cookbook function:
#let cover = [
    = Nice Cover
    Some cool stuffs
]

#let back-cover = [
    = Nice Back Cover
    Some cool stuffs
]

#show: cookbook.with(
  title: "My Cookbook",
  custom-cover: cover,
  custom-back-cover: back-cover
)
front-matter and back-matter
You can have two other pages who appear at right for the front-matter, just after the cover and at left for back-matter just before the back cover. If you to print separatly the covers and the content like some services online, it’s better to do that to keep a good page numeration.
When I have used these properties, I dit it with the citation-block function that is described below.
colors and style
fancy-cookbook loves colors and is available with 17 colored palettes:
- amber
- blue
- brown
- coral
- forest
- green
- grey
- indigo
- lagoon
- lime
- orange
- pink
- purple
- rose
- slate (the default one)
- sunset
- teal
You can see them in action in two styles :
A palette is something like this :
#let palette-lime = (
  dark: rgb("#4d9221"),
  medium: rgb("#a6d96a"),
  light: rgb("#f7fcb9")
)
So when you need to set a palette you can use one of these and I will show you how, or create your own. You only need to respect the 3 keys : dark, medium, and light.
For the cookbook function, the palette should be set like this :
#show: cookbook.with(
  title: "My Cookbook",
  subtitle: "All that good",
  palette: palette.blue
)
to use one of the palettes in the package.
Or you can do this :
#let palette-lime = (
  dark: rgb("#4d9221"),
  medium: rgb("#a6d96a"),
  light: rgb("#f7fcb9")
)

#show: cookbook.with(
  title: "My Cookbook",
  subtitle: "All that good",
  palette: palette-lime
)
to use yours. In this example, I used the palette lime that is already in the package.
If you want to change colors between chapters, like me, I recommand to use the chapter function that will be explained later.
Now it’s time to talk about style. This property has only effect on the ingredients block. There is 2 styles available :
- flat: which is the default one, medium color for the border, light color for the background and dark color for the groups titles.
- gradient : there is 2 differences.
- The background is now a gradient between the medium color and the light one.
- And to preserve contrast on the upper part, the dark color used for the groups titles is a little darker.
To set the gradient style for your book you can write:
#show: cookbook.with(
  title: "My Cookbook",
  subtitle: "All that good",
  style: style.gradient
)
custom-i18n
Translations is a part of this package. I have provided 4 languages in this version (and you can suggest others if you want on Github), but you can also provide your own version of the different labels.
The 4 languages are :
- fr : for french
- en : for english
- es for spanish
- pt : for portuguese
To set the current language in any part of the document you can use this instruction (which I recommend you to do every time, in all your document), example with french :
#set text(lang:"fr")
Do it before calling the cookbook function. You can also switch between recipe your language with this instruction, but I don’t know why you would do that.
Another way is to set the property lang of the cookbook function:
#show: cookbook.with(
  title: "My Cookbook",
  lang: "pt"
)
But this will apply the language only for the cookbook itself, your document will “stay” in English.
What can you do if your language is missing ?
You can add your own language by setting a dictionary with the labels to translate and use the custom-18n property. Here is the English version :
#let english = (
    en: (
      appendices: "Appendices",
      author: "AUTHOR",
      authors: "AUTHORS",
      index: "Thematic Index",
      ingredients: "INGREDIENTS",
      notes: "CHEF'S NOTES",
      page-short: "p.", // this will appear with labels and references
      preparation: "PREPARATION",
      toc: "Table of Contents"
    )
)

#show: cookbook.with(
  title: "My Cookbook",
  custom-i18n: english
)
And it will add your dictionary to the others. But you need to set the languages (#set text (lang:"fr")) with the one you have just added.
What if there is my language, but I want to use custom labels ?
Because the English language already exists, the previous example will not really add English (but this is true for an unknown one), your version will replace mine. But you can also, only change one label at a time like this :
#let english = (
    en: (
      toc: "Recipes"
    )
)

#show: cookbook.with(
  title: "My Cookbook",
  custom-i18n: english
)
And only the toc label will be changed.
chapter-start-right
The chapters appear as a separation page with a big title in the middle (it’s more like a part separation). I like it when this page is on the right side, so impair numbering page.
If you like it too, just add this property set to true like this :
#show: cookbook.with(
  title: "My Cookbook",
  chapter-start-right: true
)
custom-appendices
The appendices section appears at the end if you set this property or if you add some tags to the recipes.
This property adds what you want in the part, because it simply accepts content. In my cookbook I used it to add a glossary, but you can add a bibliography or whatever you want.
To set this property, I recommend to do it like that :
#let appendices = [
    = Nice
    Some cool stuffs
]

#show: cookbook.with(
  title: "My Cookbook",
  custom-appendices: appendices
)
custom-indexes
As I have said for the tags in the recipe function or just before in the custom-appendices properties, the appendices section appears with a tag in a recipe. And if we do nothing it will have an index called in English “Thematic Index”. This default index looks like the toc, but smaller. It will have all the keys you used as tags and the recipes that have this tags.
If you only have one type of information in your tags, it’s a good thing. But if you have different information like me (I used the location and type of recipe), you’ll probably want 2 different indexes. So with this property, you’ll replace the default index with yours.
Here is an example with locations and types :
#let location = (
    france: "France",
    spain: "Spain"
)

#let type = (
    dessert: "Dessert",
    meal: "Meal"
)

// a function to transform a dictionary to a list
#let dict-values(d) = d.keys().map(k => d.at(k))

#let indexes = (
  (
    title: [Recipe by Locations],
    tags: dict-values(location)
  ),
  (
    title: [Recipe by Types],
    tags: dict-values(type)
  )
)

#show: cookbook.with(
  title: "My Cookbook",
  custom-indexes: indexes
)

#recipe(
  [Banana Jam],
  description: [Sweet Jam],
  tags: (country.france, type.dessert)
)


#recipe(
  [Paella],
  description: [Very good],
  tags: (country.spain, type.meal)
)
only-recipes
This property will set off the cover, the toc, the back-cover and the appendices if you set it to true:
#show: cookbook.with(
  title: "My Cookbook",
  only-recipes: true
)
not-a-recipe
Simple to use but it’s optional. I have tried to minimize as much as possible the size of a recipe. So certain rules are not so nice when it’s not a recipe.
To add more space to a section with text, for explanations for example, I created this function for that purpose. Use it as follows:
#not-a-recipe(name: "Introduction")[
    Many things to say with *bold text* and whatever you want.
]
You can also change the palette like for recipe:
#not-a-recipe(name: "Introduction", change-palette: palette.lagoon)[
    Many things to say with *bold text* and whatever you want.
]
chapter
You can change the colors from a chapter in your document by using this command:
#chapter(change-palette: palette.green)[Main]
or another one or your custom palette. I used it for each chapter of my book (Starter, Main, Dessert, …) with different colors.
It’s important to understand that the change is not only for the current chapter. It’s start there and everything that follow will have the same. There’s only one exception, As the appendices section and the back-cover are parts of cookbook they keep the palette chosen from cookbook.
You can set a new chapter only (without changing colors) as follows:
#chapter[Main]
Or, if you prefer Markup:
= Main
And it’s easy to do that if you never change the palettes. It’s like you want.
You can also add a quote below your chapter title with these options:
#chapter(
  quote-content: [If you want to become a great chef, you have to work with great chefs. And that's exactly what I did.],
  quote-author: [Gordon Ramsay],
)[Main]
set-all-palettes
this function help you to manually set all the pages where the palette changes. When all your document is done you can choose manually every time you want to change colors like this:
#let pages-palettes = (
  (palette: palette.blue, page: 3),
  (palette: palette.green, page: 5),
  (palette: palette.rose, page: 8),
  (palette: palette.sunset, page: 10),
)
#set-all-palettes(pages-palettes)
citation-block
The citation block used in the chapter function can be used elsewhere. I dit it myself for the back-matter and front-matter of my book (in French):
#let palette-cookbook = palette.indigo

#let front-matter = citation-block(
  content: [La cuisine, c'est quand les choses ont le goût de ce qu'elles sont.],
  author: [Curnonsky],
  palette: palette-cookbook
)

#let back-matter = citation-block(
  content: [On apprend la cuisine avec celle des autres... à un moment donné on fait la sienne.],
  author: [Jean-François Piège],
  palette: palette-cookbook
)

#show: cookbook.with(
  title: [My Cookbook],
  subtitle: [So good],
  palette: palette-cookbook,
  front-matter: front-matter,
  back-matter: back-matter
)
I have set a value for the cookbook palette that I can use in the cookbook itself, the back-matter and the front-matter. It’s okay because in my book I have appendices that implicitly set the same palette as the one used initially by the cookbook itself. If you don’t have appendices, you can adjust the palette to be the same as the last one used.
Utility functions
There is 2 bonus functions that I use with this package.
dict-values
I use this function to convert a dictionary to a list of values. I prefer to use dictionaries for my tags and with this function I can easily create custom indexes. There is an example of usage in the custom indexes part, and also the code of this functions
show-metadata
I use this one for debugging. But if you want to see where the palette changes in the document, you need to do this:
#show-metadata(page-palette-meta-name)
Or if you want to see the metadata of the recipes (with tags):
#show-metadata(recipe-meta-name)
Examples
Finally, you can find examples in the Github Project