This is a tool to build online tutorials for Typst packages. It allows you to include examples of your package that are automatically rendered to SVG files with optional light/dark mode support.
Toot consists of a Typst template and a Julia CLI app that work together to
create a set of HTML files, a bit similar to the output of mdbook.
Getting started
First, we set up a new Typst project using the template. This should happen at the root level of your Typst package.
typst init @preview/toot
cd toot
You will find a src folder with three files in your current path:
SETUP.typ: This is where you configure your toot output. See below for configuration options.index.typ: The “landing page” of your tutorial. It also serves as a template for all further pages you would like to produce. See below for details.OUTLINE.typ: This is similar to theSUMMARY.mdfile you might know frommdbook. Every#linkin this file defines a page that will be included in the final result. Note that the code contains links to.typfiles but they will appear as links to HTML files on the web page.
Configuration in SETUP.typ
If you follow the instructions above, your SETUP.typ file should call the
setup-toot function.
It accepts the following keyword arguments:
name: The name of the package you want to create a toot for (stringorcontent).universe-url: The URL of your package’s page on the Typst Universe (astringof the form"https://typst.app/universe/package/...").root: By default, toot expects the built website to be served directly from your domain (i.e.src/index.typwill result inyour-domain.org/index.html) but you can set a different path. If you setrootto"some/nested/path", the landing page will beyour-domain.org/some/nested/path/index.html. This is important for cross links (see below) and static assets.styling: Adictcontaining styling options. Currently only respects the keyaccent-colordetermining how decorative elements on the website are colored (defaultgray).outline: Any content that will be shown on the left hand side navigation menu. There shouldn’t be a reason for this to be anything else thaninclude "OUTLINE.typ".snippets: Anarrayof snippets that can be used in#examples (see below). Each snippet must be adictwith atriggerand anexpansionentry. Earlier snippets can have extensions containing triggers of later snippets. There is a built-in snippet with trigger"// LIGHT DARK"that inserts code handling light and dark styling of examples.general-head-extra: Arbitrary HTML content that is supposed to be added to the<head> </head>of every produced HTML page.
Creating a page
Every Typst source file for a page should start with
#import "/SETUP.typ": *
#set document(title: [Title of this page])
#show: toot-page
By using #set document(title: ...), we make sure that the title also appears
in the HTML <title> </title>.
The #show: toot-page adds the necessary scaffold for the web page.
You can write #show: toot-page.with(head-extra: ...) to add some HTML content
to the <head> </head> of this page.
Adding examples
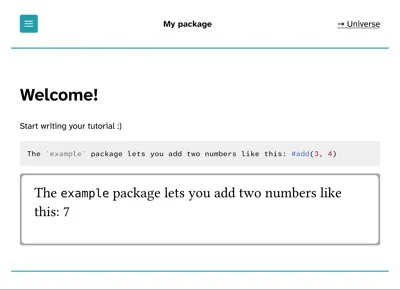
Use the #example function to add an example of using your package to a page.
It will be accompanied by an image showing its result.
#example(
  ```typ
  // START
  You can use the #fancy-feature(42) from my package.
  ```
)
Often, your examples will include some boilerplate that might be distracting
from your pedagogical intention.
You can control which lines are shown using // START and // STOP markers
(which are hidden themselves):
#example(
  ```typ
  #some-invisible-setup(a: 13, b: <foo>)
  // START
  This line will appear on the website.
  // STOP
  This will be hidden again
  // START
  This will be shown.
  ```
)
As you can see, you can use arbitrary many // START and // STOP.
All lines before the first // START will be hidden.
Other than that, you can make use of the snippets you defined in
src/SETUP.typ.
This avoids repetitive code and the need to potentially update, say, the font
for every example.
It also makes sense to have a snippet setting the page size unless you really
want A4 paper sized example images.
#example also has some optional keyword arguments:
columns: If your example produces multiple pages, here you can control how many of them should be displayed next to eachother (default1).border-color: Thecolorof the border to draw around the image (defaultgray).hide-code: Whether or not to hide the code on the website (defaultfalse).hide-output: Whether or not to hide the output on the website (defaultfalse).
Cross linking
For cross linking, you can use #i-link.
It works like the standard #link, i.e.
#i-link("path/to/file.typ")[click here] but the destination will be modified
such that
.typbecomes.htmland- if necessary, it is prefixed by the
root(as configured insrc/SETUP.typ, see above).
Building the website
While writing the tutorial, you might want to rely on Typst’s speedy live preview. It won’t give you the full experience but running
typst watch --features=html --format=html src/your-file.typ
offers a decent preview. Most notably, examples will not be rendered and you cannot navigate to other pages of the toot.
To actually build the whole thing, you have to run the toot-builder Julia CLI.
Install it like this:
julia -e 'import Pkg; Pkg.Apps.add(url="https://codeberg.org/a5s/toot")'
Within your toot folder (the one created by typst init @preview/toot) run
toot-builder build
which produces a build directory (if you prefer a different name, use the
--build-dir="other name" argument) you can then deploy.
For a live view use
toot-builder serve
toot-builder reads src/OUTLINE.typ (or another file defined by the
--outline=src/my-outline.typ argument) and identifies all Typst source files
linked to.
Only those will be compiled to HTML and included in the build.
Conversely, that means that you can exclude draft pages from the produced
website by not adding them to the outline.
Optional dependencies
toot-builder calls the following programs if available:
You can opt out of these tools being run by adding the --no-minify option.
