(This is a guest post by community member and contributor @Dherse.)
A new feature released in Typst 0.9 is color gradients. In this article we are discussing the reasons why it is a key feature for the future of Typst how they were made, and how I lost my sanity creating them.
 by Sébastien d'Herbais de Thun
As part of the newest, and probably largest, update for Typst, a new feature is dropping to add color to your documents: Color gradients. Color gradients are vital for design and data visualization, two important niches that Typst is trying to fill. This new feature took close to four months to get to a production-ready stage and cost most of my remaining sanity, but it will make your document prettier so it was worth it in the end.
Colors: Rework and new color spaces
Before we can talk about gradients, we need to talk about colors. In the previous
version of Typst, you may have noticed that colors were sometimes a bit off. This
was due to the fact that Typst was not in fact using the sRGB color space.
Instead, Typst was using an approximate color space because sRGB is not available
in PDF. Additionally, the number of color spaces supported by the PDF standard
is very limited. This meant that to prepare Typst for gradients, I had to rework
the entire color system. This involved a fairly massive pull request
(#2171), which introduced a number of new
color spaces: hsv, hsl, oklab,
and linear-rgb. It also introduced better color reproduction
by using ICC profiles to make
rgb and luma more accurate.
But how did we implement these color spaces when PDF does not support them out of the box?
The answer is simple and still makes me shiver: They are implemented using PostScript
functions --- very long, very complicated PostScript functions. The PostScript language
is the language that underpins the PDF files we all know and love tolerate. It is
a stack-based language that is quite powerful, but also hard to use. As it happens,
color conversion functions, while being part of the PDF standard, cannot use other
functions and have access to a very limited number of instructions. This means that you
cannot call subroutines, use loops, or even use variables. This makes the implementation
of these functions very hard and very long. For example, the Oklab to linear-RGB
conversion function is around 200 instructions long. I painstakingly wrote it by hand and
had the displeasure of debugging it.
With these changes, and more specifically the introduction of ICC profiles, colors
in Typst will now look the same regardless of the device or reader you are using.1
This is a big step forward allowing for your documents to look more consistent and
look better on a wider range of devices. These changes also introduce improved color
space conversions and new features such as the ability to rotate
the hue, saturate, and desaturate colors.
Perhaps the most important change is the introduction of the Oklab color space. This color space is a perceptually uniform color space, meaning that the distance between two colors in the Oklab space is proportional to the distance between these two colors as perceived by the human eye. Perceptual uniformity is a very important property for data visualization, as it means that the colors will be perceived as being equally different from each other. This is not the case for other color spaces, such as sRGB. For this reason, Oklab is now the default color space for gradients and color mixing. Additionally, it has the advantage that when printed in grayscale, the colors will still be distinguishable, a feature that is necessary for publishing scientific papers and desirable for accessibility of documents.
A primer on gradients & API overview
Color gradients are used in many places without necessarily being noticed. While you may be most familiar with the timeless Word Art we all created as kids, they are also prevalent in data visualization and other artistic endeavors. In the context of Typst, we chose to stick to the most common gradients for now: Linear gradients, radial gradients, and conic gradients. Additionally, we chose an API similar to CSS gradients to make it easier to use for people familiar with web development.
#rect(
  width: 100%,
  height: 30pt,
  fill: gradient.linear(
    ..color.map.rainbow,
  )
)

From this first example, we can already see a few things. First, gradients are applied
in the same way as a color, using the fill or stroke properties. Second,
gradients are their own type, gradient, and are created using constructor functions
(in this example linear). As we will discuss later on, Typst also ships with a number of
predefined color maps that can be used to quickly create gradients. In this example, we
are using the rainbow color map.
#set align(center)
#circle(
  radius: 50pt,
  stroke: 2pt + gradient
    .conic(..color.map.rainbow)
    .repeat(2, mirror: true)
)
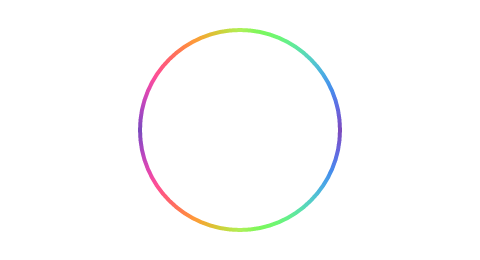
You can also use gradients as the stroke of a shape. In this example,
we are using the conic which is a gradient that rotates around a
center point. We are also using the repeat method to repeat the gradient
twice, and the mirror option to mirror the gradient making it a nicer
continuous pattern.
These first two examples show how gradients can be built up from simple components in a composable way. Additionally, gradients support several features that will become relevant in the following sections: Sharp stops, direction, and sampling.
#rect(
  width: 100%,
  height: 30pt,
  fill: gradient
    .linear(black, yellow, red)
    .sharp(3)
)

We can create gradients using a list of colors, and if we do not specify any other options,
these colors will be evenly distributed along the gradient. In this example, we are
using the sharp method to let the gradient have three distinct stops instead of a smooth
transition, creating the Belgian flag (my home country).
#rect(
  width: 100%,
  height: 40pt,
  fill: gradient.linear(
    angle: 30deg,
    (red, 0%),
    (blue, 20%),
    (green, 80%),
    (purple, 100%),
  )
)

Similarly, we can specify the stops of a gradient using arrays of two values: A color
and a ratio. The ratio is a number between 0% and 100% that specifies where
the color should be placed in the gradient. Note that the colors must be in ascending order
of ratio. We can also specify either the direction or the angle of
the gradients. In this case, we are using the angle option to specify the angle of the gradient
and create an ugly rainbow.
The final, and perhaps most important feature of gradients is the ability to sample them at a given
point. This is useful for data visualization, as we will see later on. This is done using the
sample function. It will clamp its argument within the range 0% to 100%.
#(gradient
  .linear(red, blue)
  .sample(50%))

You can also specify the area the gradient should cover with the relative argument.
It can be either "self" or "parent". The default mode is "self", which means that the
gradient's bounding box will coincide with the bounding box of the shape or element itself. When set to "parent", the gradient
instead becomes relative to the parent container (a surrounding box, block, page, or similar construct).
In the example below, you can see a gradient being used as the fill of a
rectangle. The gradient is relative to the page since the page is the closest
ancestor container.
#align(
  center + horizon,
  rect(
    width: 80%,
    height: 30pt,
    fill: gradient.linear(
      red,
      blue,
      relative: "parent",
    ),
  )
)

You can also use gradients on text as a nice effect. This is done by setting the fill property
of the text to a gradient. Note that, on text, only the "parent" relative is currently
supported and it is used by default. We made the decision, as can be seen in the
tracking issue, to only support that
mode for now. This is because the "self" relative on text is equivalent to per-glyph gradients,
which are not very useful, very heavy in terms of file size, and incredibly difficult to get right.
#set text(fill: gradient.linear(
  ..color.map.rainbow,
))

A famous Chinese #box[poem]
about the hard work of farming:

#box[
  李绅《悯农》
  锄禾日当午,
  汗滴禾下土。
  谁知盘中餐,
  粒粒皆辛苦
]

Data visualization: Color maps
An important part of visualizing data is the ability to map a value to a color. You may not have noticed it, but a lot of research papers use colors to represent a value. Below you can see an example from Google that shows a color map being used to represent the distance from an object to the camera.
This is a very common technique, but it is not without flaws. The most common color maps used are the rainbow and the jet color maps. These color maps are not perceptually uniform, meaning that the distance between two colors is not proportional to the perceived difference between these two colors. This means that parts of your data can be misrepresented and that the colors will not necessarily be distinguishable by people with color blindness or when printed in grayscale. This is why Typst ships with a number of color maps that are perceptually uniform, and only one that is not (rainbow). Below you can see the complete list of color maps that Typst ships with:
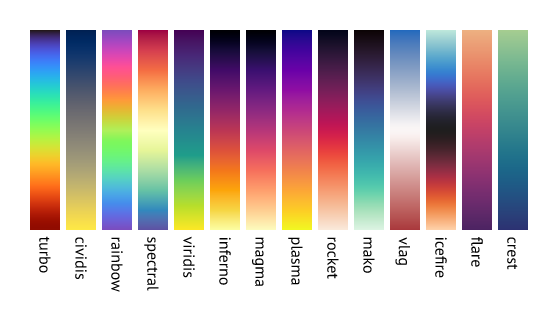
I would recommend using the ones that fit your needs the best, but if you are unsure, I would
recommend using the inferno and viridis
color maps. These were designed specifically to be perceptually uniform and are
commonly used in scientific papers. The rainbow color map is not
suitable for data visualization, but it is still useful for artistic purposes.
You can easily use these maps by using the sample method on a gradient.
This method will return the color at the given ratio. This means that you can simply map your
values within the range 0% to 100% and use the result as the color of your data point.
Below you can see an example of this technique being used to visualize the Mandelbrot set,
inspired by @SeniorMars'
experimentation.

With the awesome cetz package having more and more plotting features, I cannot wait to see what people will do with Typst, gradients, and data visualization. All of the tools are there, all we now need is for people to experiment and create using them. Science will never have looked so good.
What if we had a standard document format?
Now, it is time to discuss my dwindling sanity brought to you by the PDF standard. As you may know, PDF is a rather old standard, having been around for longer than I have been alive. As such, you would expect that it would have a well-defined and ubiquitous support of its features. Unfortunately, this is far from reality and, as it turns out, PDF readers are a hit or miss when it comes to supporting the features needed to implement gradients in a consistent way. This is why I had to implement a number of workarounds to make sure that gradients would work as expected in most readers.
The first issue I encountered was that the PDF standard defines color conversion functions in a very
unique way. These functions are not allowed to use other functions and are not allowed to use variables
which meant programming the entirety of the conversion functions using the stack. This is not a big
deal, but it does make the code harder to read and debug. The second issue I encountered was that
the code must be wrapped in curly braces { and }. This is not a big deal either, but figuring
this out required untold hours of debugging as some readers would work, and others would not. Finally,
for some reason, the PDF standard only allows the range of values to be between 0 and 1 when
passed to these functions. This is a big deal because it means two things: First, we must normalize
all color components before writing them to the file. Second, most readers don't care about this, but
some do. Which meant that when working on improved color support, I only encountered this issue much
later on, and it took me a while to figure out what was going on.
The first gradient type I implemented were linear gradients which were pretty uneventful. Using the existing code in pdf-writer and svg2pdf, they were quickly implemented requiring little in the way of workarounds. The second gradient type is the radial gradients, which are also pretty easy to implement since they are natively supported. So far so good, after the debacle that was color support, we now have two gradient types that are easy to implement and work as expected. Surely the third and final kind will be just as easy to implement, right?
Wrong! The conic gradient type is the most complicated to implement, and the most complicated to make work across all readers. The reason for this is that PDF does not support it natively. This means that we have to implement them using a combination of other features that are not necessarily intended for this purpose. I tried many different techniques, not all of which worked.
The first technique I tried was using a sampled pattern. This is equivalent to using a picture of the gradient. This worked, but it has several issues. Chief among them is that it leads to incredible bloat in the file size. This is because the gradient must be sampled at a very high resolution or we risk running into the second issue: Pixelation. Since we are pre-sampling the gradient, we are limited by the resolution of the image. This means that if we want to have a smooth gradient, we need to sample it at a very high resolution.
The second technique I tried was using a PostScript function to draw the gradient. This is a function
that takes in an X-Y coordinate and computes the color at that point. This is a very elegant solution
that works very well. Indeed, the idea would have been to have a function that takes in the X-Y coordinate
and returns a sample in the range 0% to 100%. Then, we would use a shading function to map the sample
to a color. This is even better because it allows us to reuse the entire logic for linear and radial
gradients. Unfortunately, several readers do not support this feature. This meant that we were back to the
drawing board.
The third technique, and the one we ended up sticking with, is the Coons patch
method. A Coons patch is a kind of geometric construct defined by four points and eight control points.
It can be used to depict three-dimensional geometry. In this case, we are using it
to create a circle. Initially, I would calculate a value in the range 0% to 100% proportional to the angle.
Then, just as before, we can use a shading function to map that value to a color.
This meant that we were introducing only four Coons patches (one for each quadrant) and reusing the logic
of other gradient types. Great!
Well not so fast buckaroo, you forgot to ask our corporate overlord: Apple. Indeed, they have their own PDF reader which is generally very good. Unfortunately, in their infinite wisdom, they do not support using a shading function for color mapping when using Coons patches. And since they have no feature request page (there is one on Apple's website but I never got any follow-up) nor issue tracker for this product, it may never get implemented.
This means we need a fourth technique? Not really, as I previously hinted at, we can still use Coons patches, but we need to create at least as many patches are there are stops in the gradient. This leads to larger files than the other techniques and requires duplication of the logic but it works in all readers we have tested so far.
I honestly feel like PDF is not a good standard. While having an official, agreed-upon standard, most readers have quirks and limitations leading to more complex export logic than should be needed. Additionally, as we will explore in the next section, PDFs are really hard to debug.
Debugging PDF
As it turns out, debugging PDF files is really difficult. In this section, I will introduce the tools I used to debug the test files generated throughout this project because I believe this is of interest to the wider community and other Typst contributors. There are four tools in particular that are of interest for PDF debugging:
- PDF Object Browser is a tool maintained by the PDF.js people that allows you to browse the tree-like object structure in a PDF file. This is useful to compare your PDF file with a reference file and see what is different. It is also useful to see what is in the file and how it is structured.
- GhostScript is an interpreter for PostScript that allows you to test
your PostScript functions. You can also use its
prepressfeature to pre-process PDF files. Sometimes pre-processing a PDF file will either give you a mostly human-readable error message, or it will silently fix the error which you can then reverse engineering using the PDF Object Browser. - XPDF Reader is a very old PDF reader, but it is also the only one I know of that actually gives meaningful error messages when it encounters issues in a PDF file. This can allow you to debug some features that would silently fail in other readers.
- mutool is a series of tools that can help you debug PDF files.
Finally, try and use existing tools such as Word, Adobe Illustrator, and others to create PDF files with the features you're trying to implement and compare them with your own files. This can help you figure out what is wrong with your files and how others have tackled the same issues.
SVG and the missing gradient
As you may know, Typst supports SVG export. And as you may have guessed, SVG also supports gradients. This makes the implementation of gradients in SVG rather simple in theory. In practice, it is a bit more complicated. The reason for this is that SVG does not support conic gradients and does not provide as much control over color spaces as a PDF does.
For conic gradients, this requires a bit of trickery. Most guides on the internet suggest using a
<foreignObject>, plopping a
<div> in there and using CSS. Because for some reason, CSS supports conic gradients but SVG
does not. Why the SVG standard made such a decision is beyond me, but it is what it is.
You might expect that they would be included in the SVG 2.0 spec but no, it's not there either.
Additionally, most SVG readers will not enjoy you adding HTML in the middle of their SVG files. This
means that we need to find an alternate solution: Enter triangles, lots and lots of triangles.
Below is a small demonstration of how Typst is implementing conic gradients in SVG. The idea is to draw a bunch of triangles forming a circle and to color each of these triangles with its own linear gradient. This is a definite hack and leads to larger file sizes than would be necessary if the SVG people just gave us conic gradients, but it works. You can see side-by-side three different versions, the first shows a gradient as it would normally be rendered by Typst, the second shows an example where not enough triangles were used, and the third shows an example with few outlined triangles to make them more visible. If you zoom out, you might notice that the second gradient becomes indistinguishable from the first one. This is how the illusion works and why we need so many triangles: So that the gradient looks smooth when zoomed in.

Conclusion
Implementing gradients was a far more involved endeavor than I had anticipated. It took a lot of time, in fact, close to four months of work, to get it production ready. It took a lot of trial and effort to get a solution that works smoothly across all readers. It took a lot of debugging to figure out what was wrong with the files and how to fix them. But in the end, I think it was worth it. Gradients are an essential tool for artistic and scientific endeavors and I am glad that Typst now supports them.
In this blog post, we briefly discussed the new color system, the new gradient feature, and how I painstakingly implemented them all. It goes without saying that I did not do this work alone and many of the community members on Discord also participated in many ways. I would like to thank them for their help and support throughout this process. I would also like to thank the Typst team for allowing me to publish on their official blog. Finally, I would like to thank you for reading this article and I hope you will enjoy using gradients in your documents.
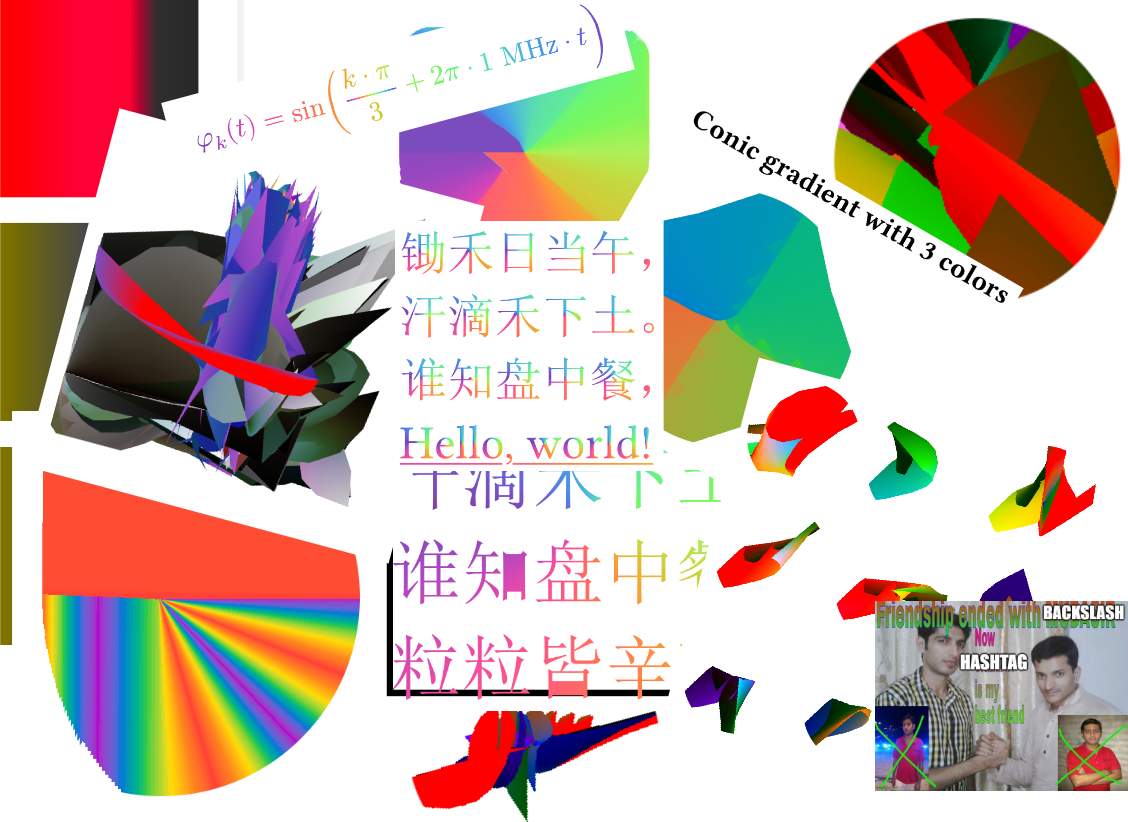
Finally, I leave you with this collection of various fails and successes I encountered while implementing gradients. Enjoy this beautiful collage made in paint.
This is not entirely true, as PDF readers are not required to support ICC profiles, but most do. If yours doesn't consider using something else.