Utilities to write exams and exercises with integrated solutions. Set the variable #(cfg.sol = true) to display the solutions of a document.
Currently the following features are supported:
- Automatic total point calculation through the
#points()and#totalpoints()functions. - Checkboxes that are either blank or show the solution state using eg.
#checkbox(cfg, true). - Display blank lines allowing students to write their answer using eg.
#lines(cfg, 3). - A proposition for a project structure allowing self-contained exercises and a mechanism to show or hide the solutions of an exercise.
Usage
Minimal Example
#import "@local/tutor:0.8.0": points, totalpoints, lines, checkbox, default-config

#let cfg = default-config()
// enable solution mode
#(cfg.sol = true)

// display 3 lines (for hand written answer)
#lines(cfg, 3)
// checkbox for multiple choice (indicates correct state)
#checkbox(cfg, true)

// show achievable points
Max. points: #points(2)
Max. points: #points(3)
// show sum of all total achievable points (will show 5)
Total points: #totalpoints(cfg)
Practical Example
Check example for a more practical example.
tutor is best used with the following directory and file structure:
├── main.typ
├── src
│   ├── ex1
│   │   └── ex.typ
│   └── ex2
│       └── ex.typ
└── tutor.toml
Every directory in src holds one self-contained exercise. The exercises can be imported into main.typ:
#import "@local/tutor:0.8.0": totalpoints, lines, default-config

#import "src/ex1/ex.typ" as ex1
#import "src/ex2/ex.typ" as ex2


#let cfg = default-config()
#ex1.exercise(cfg)
#ex2.exercise(cfg)
Supporting self-contained exercises is one of tutors primary design goals. Each exercise lives within a folder and can easily be copied or referenced in a new document.
An exercise is a folder that contains an ex.typ file along with any other assets (images, source code aso). The following exercise shows a practical usage of the #checkbox() and #points() functions.
src/ex1/ex.typ
#import "@local/tutor:0.8.0": points, checkbox

#let exercise(cfg) = [
#heading(level:cfg.lvl, [Abbreviation FHIR (#points(1) point)])

What does FHIR stand for?

#set list(marker: none)
- #checkbox(cfg, false)  Finally He Is Real
- #checkbox(cfg, true)   Fast Health Interoperability Resources
- #checkbox(cfg, false)   First Health Inactivation Restriction

#if cfg.sol {
  [ Further explanation: FHIR is the new standard developed by HL7. ]
}
]
Finally this second example shows the #lines() function.
src/ex2/ex.typ
#import "@local/tutor:0.8.0": points, lines

#let exercise(cfg) = [
#heading(level:cfg.lvl, [FHIR vs HL7v2 (#points(4.5) points)])

List two differences between HL7v2 and FHIR:

+ #if cfg.sol { [ HL7v2 uses a non-standard line format, where as FHIR uses XML or JSON] } else { [ #lines(cfg, 3) ] }
+ #if cfg.sol { [ FHIR specifies various resources that can be queried, where as HL7v2 has a number of fixed fields that are either filled in or not]} else { [ #lines(cfg, 3) ] }
]
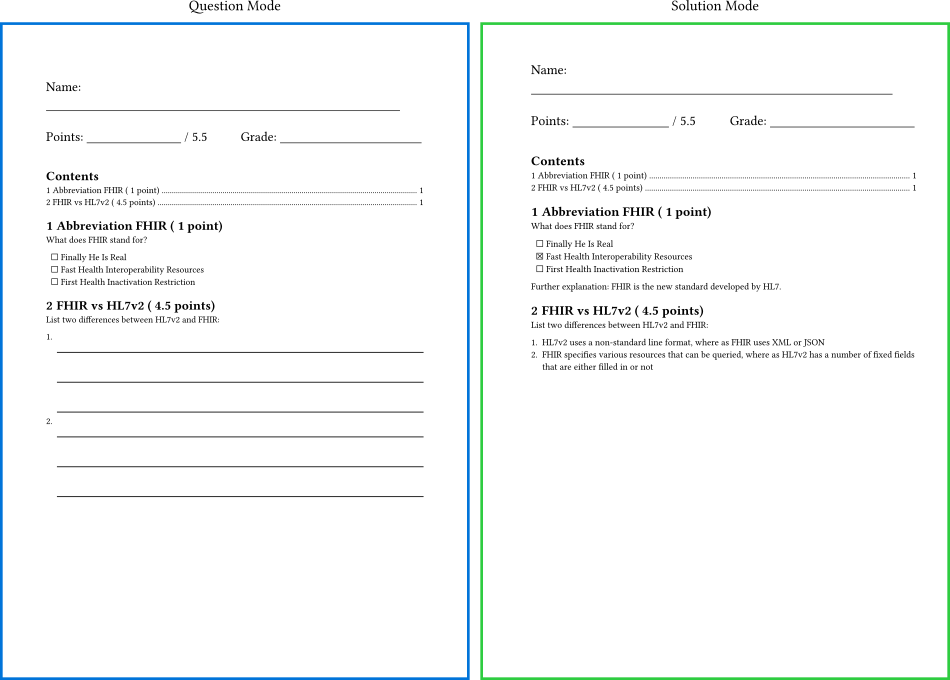
This would then give the following output in question mode (#(cfg.sol=false))
and in solution mode (#(cfg.sol=true)):

Utilities
lines
#lines(cfg, count) prints count lines for students to write their answer.
Configuration:
// Vertical line spacing between rows.
#(cfg.utils.lines.spacing = 8mm)
grid
#grid(cfg, width, height) prints a grid for students to write their answer.
Configuration:
// Grid spacing.
#(cfg.utils.grid.spacing = 4mm)
checkbox
#checkbox(cfg, answer) shows a checkbox. In solution mode, the checkbox is shown filled out.
Configuration:
// Symbol to show if answer is true
#(cfg.utils.checkbox.sym_true = "☒")
// Symbol to show if answer is false
#(cfg.utils.checkbox.sym_false = "☐")
// Symbol to show in question mode
#(cfg.utils.checkbox.sym_question = "☐")
points
#points(cfg, num) displays the given num while adding its value to the total points counter.
Configuration: none
totalpoints
#totalpoints(cfg) shows the final value of the total points counter.
Configuration:
// If points() is used in the outline, totalpoints value becomes doubled.
// By setting outline to true, totalpoints gets divided by half.
#(cfg.utils.totalpoints.outline = false)
Modes
tutor comes with a solution and a test mode.
solution mode
Solution mode controls wheter solutions are shown or not. This mode controls eg. the utility #checkbox(cfg, answer).
(cfg.sol = false): Solutions are hidden. This is used for the actual exam handed out to students.(cfg.sol = true): Solutions are shown. This is used to create the exam solutions.
You can also use the following helper functions:
if-sol(cfg,[Content only shown in solution mode.])if-sol-else(cfg,[Content only shown in solution mode.], [Content only shown in exam mode.])
test mode
Test mode can be used to show or hide additional information. In test mode, one might want
-
(cfg.test = true): Test information are shown. Use this eg. to display#points(4). This is used in case the document is used as an exam/test. -
(cfg.test = false): Test information are hidden. This is used in case the document is used as an excerise.
The following would show the points only in test mode.
#if cfg.test {
  #points(4)
}
Or you can use the following helper functions:
if-test(cfg,[Content only shown in test mode.])if-test-else(cfg,[Content only shown in test mode.], [Content only shown in exercise mode.])
Configuration
tutor is designed to create exams and solutions with one single document source. Furthermore, the individual utilities provided by tutor can be configured. This can be done in one of three ways:
- Use the
#default-config()function and patch your configuration. The following example would configure the solution mode and basic line spacings to 8 millimeters:
#let cfg = default-config()
#(cfg.sol = false)
#(cfg.utils.lines.spacing = 8mm)
- Use an external file to hold the configurations in your prefered format. See tutor.toml for a configuration in TOML. Load the configuration into your main document using
#let cfg = toml("tutor.toml")
- Use typst’s input feature added with compiler version 0.11.0. Add the following snippet to load the configuration, then overwrite it from the CLI like this:
typst compile --input tutor_sol=true main.typ
#let cfg = toml("tutor.toml")

#if sys.inputs.tutor_sol == "true" {
  (cfg.sol = true)
} else if sys.inputs.tutor_sol == "false" {
  (cfg.sol = false)
}