Create project in app

This template helps you print onto label sheets with rectangular grids of labels. It provides you with a grid of rectangular regions that you can draw label content into, potentially customizing the content of each individual label.
The main features are the following:
- configure the page dimensions to match the label sheet from your manufacturer: margins, orientation, number of labels per row and column, gutters between labels
- “upside-down” support for cases when the paper should be put into the printer flipped 180°
- configure label layout: optional subdivision of labels into sublabels, content orientation (equivalent to
page.flipped, but for individual (sub)labels) - optionally show label edges
- apply content to (sub)labels:
- repeat label contents a specified number of times
- skip labels that have already been used in a previous print
- apply a content-creating function to an array of data, taken e.g. from a JSON or CSV file (this is just vanilla Typst)
Getting Started
Using the Typst web app, you can create a project by e.g. using this link: https://typst.app/?template=etykett&version=latest.
To work locally, use the following command:
typst init @preview/etykett
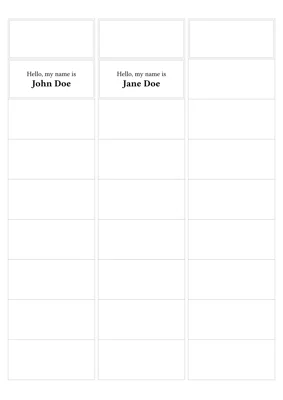
Usage would the look something like this:
#import "@preview/etykett:0.1.1"

// maybe load the data for your labels from a file, ignoring the columns header
#let data = csv("data.csv").slice(1)

// define how a label should look
#let name-label((first-name, last-name)) = [
  #set align(center+horizon)
  #set text(14pt)
  Hello, my name is\
  #set text(1.4em)
  *#first-name #last-name*
]

#etykett.labels(
  // define the dimensions of the label sheet you're printing onto
  sheet: etykett.sheet(
    paper: "a6",
    margins: 5mm,
    gutters: (x: 2.5mm),
    rows: 6,
    columns: 2,
  ),
  // when preparing the labels, you can display the label dimensions
  // border: true,

  // produce the labels for your dataset
  ..data.map(name-label),
)
Usage
See the manual for details.
